This page details the basic how-to, turn-by-turn explanation of the game, as well as details how to use the different card types.
Setup
Both players perform these action to set up the beginning of a game:
- Take the following steps before the basic steps below if you have these card types in your deck
- Separate all Psychic Creatures and Draghearts in your deck and put them into the Hyperspatial Zone if you have any.
- Put all Forbidden Impulses into the zone dictated by the Impulse. If it's in the battle zone, put a number of seals from the top of your deck on it dictated by the impulse.
- The following are basic rules and must be followed
- Shuffle your deck.
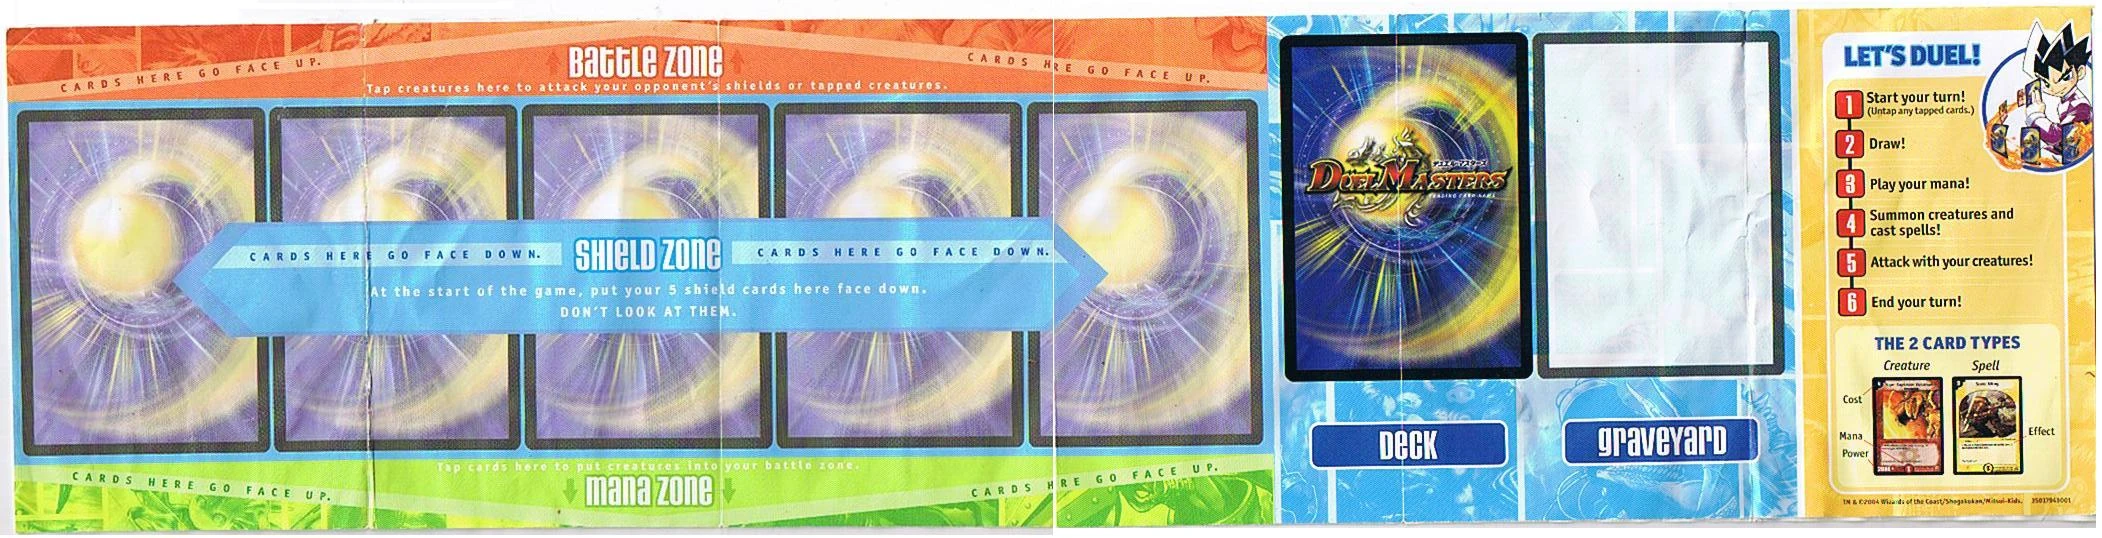
- Take 5 cards from the top of your deck, but don't look at them.
- Put them in a row in front of you face down. These face-down cards are your shields.
- Draw 5 cards from the top of your deck.
- Decide who goes first by a randomly decided process.
- This can be done as a coin toss, a dice roll or via Rock-Paper-Scissors.
How to Win
Attack your opponent with your creatures. Each time one of your creatures attacks your opponent and isn't blocked, it breaks one or more of the opponent's shields.
You win the game when you attack your opponent with a creature that isn't blocked when he or she has no shields left.
You can also win the game when your opponent has no cards left in his or her deck or they would draw their last card.
Some cards will enable you to win the game via their effects.
Turn Order
1. Start your turn.
- Don't do anything during this step of your turn if you don't have any tapped creatures in the battle zone or tapped cards in your mana zone. Tapped cards are cards that you turned sideways on a previous turn to show you used them for something. You won't usually have any tapped cards until you have already played a couple turns of the game. If you have any tapped cards, untap them now to show that you get to use those cards again this turn.
2. Draw a card.
- Only the person who plays first skips drawing a card on his first turn. Drawing a card means taking it from the top of your deck and putting it into your hand. As soon as you draw the last card of your deck, you lose.
3. Put a card from your hand into your mana zone.
- You can put only 1 card (of any type) into your mana zone from your hand each turn, unless a spell or effect allows you to put more. You don't have to put a card into your mana zone each turn if you don't want to. There's no limit to the number of cards you can have in your mana zone.
- Put the card into your mana zone upside down so you can read its mana value's number. Cards in your mana zone can give you mana to use. Mana is used to summon creatures, cast spells, generate cross gear, and put castles into your shield zone. Cards in your mana zone can't do anything but give you mana. Ignore all the text on them except for their mana value (and any Mana Reburst abilities).
4. Play cards.
- You can play as many creatures, spells, cross gears, and castles as your mana zone can afford during this step. You can play any card in any order.
5. Attack with your creatures
- You can attack with your creatures in the battle zone. You can't attack with creatures you just put into the battle zone this turn because they have summoning sickness. As many of your creatures as you want can attack each turn. Choose one, have it attack, choose another one, have that one attack, and so on.
- You cannot summon creatures, cast spells, generate or cross cross gear, or fortify shields with castles after one of your creatures attacks.
6. End your turn.
- Tell your opponent that you are finished with your turn. Now it's your opponent's turn! Continue taking turns until one of you wins the game.
Playing cards
How to cast a spell
Choose a spell from your hand. The cost for a spell is in the upper left corner. If you can't pay the cost, you can't cast the spell. You pay a spell's cost by tapping cards in your mana zone for mana. At least 1 of the mana you tapped must be the same civilization as the spell you cast. Example: To cast a nature spell that costs 4, tap at least 1 nature card in your mana zone. The other 3 cards you tap may be of any civilization.
After you pay for a spell, do what it says. If you can't do everything it says, that's okay. Just do as much as you can. Then put the spell into your graveyard. Keep your graveyard face up next to your deck.
How to summon a creature
Choose a creature from your hand. The cost for a creature is in the upper left corner. If you can't pay the cost, you can't summon the creature. You pay a creature's cost by tapping cards in your mana zone for mana. At least 1 of the mana must be the same civilization as the creature. After you pay for a creature, put it into the battle zone. There's no limit to the number of creatures you can have in the battle zone. Creatures can't attack on the turn you put them into the battle zone because they have Summoning Sickness. They will be able to attack on your next turn.
How to summon an evolution creature
An evolution creature is a special kind of creature that was introduced in DM-02. Summoning an evolution creature works just like summoning a regular creature except you can summon an evolution creature only when you have the correct kind of creature already in the battle zone. The evolution creature tells you what kind of creature you need to have.
Once you summon an evolution creature, put it on top of the creature it "evolves" from. Leave that creature underneath the evolution creature, but ignore it. Only the evolution creature's name, abilities, civilization, and power are important. Evolution creatures don't get summoning sickness even if the creature they evolved from had summoning sickness, so you can attack immediately after you put them into the battle zone. There's no limit to the number of evolution creatures you can put on top of each other.
If an evolution creature is moved from the battle zone to anywhere else, the whole pile of cards moves, not just the evolution creature on top. As long as the evolution creature is in play, it and the card it evolved from count as only one card. As soon as the pile ends up somewhere other than the battle zone, they are separate cards again. So if a spell makes you put your evolution creature into your mana zone, you get that many separate cards in your mana zone.
An Evolution Creature stays in the battle zone if it somehow loses the cards that were under it. This is important as some Evolution Creatures can remove the cards under it for an effect (usually Meteorburn).
How to play a Psychic Creature
All Psychic Creatures are placed in your Hyperspatial Zone at the start of the game. To put a Psychic Creature into the Battle Zone you have to cast a card that has an effect that specifically allows you to put a Psychic Creature from your hyperspatial zone, such as a Hyperspatial spell.
When a Psychic Creature would leave the battle zone, it is returned to your Hyperspatial Zone instead. However, for other card effects' reference, the Psychic Creature still briefly enters whatever zone it was trying to move to before it returned to its owner's hyperspatial zone.
Some psychic creatures feature a Psychic Link ability. At the start of your turn you are able to link together two or more Psychic Creatures to awaken them into a Psychic Super Creature.
Certain Psychic Super Creatures also feature the Link Release ability. When a Psychic Super Creature with Link Release would move to a different zone, only one card (or psychic cell) of the combined creature is moved (before immediately returning to its owner's Hyperspatial Zone) with the rest of the psychic cells flipped over to their unawakened state.
Note that a Psychic Creature is not summoned but is instead "put" into the battle zone; you can't summon it like a regular creature by paying it's mana cost.
The Hyperspatial Zone is situated on the right of the graveyard.

How to generate or cross a Cross Gear
A cross gear is a card that can be attached to your creatures. Cross Gear are generated by paying their cost, but they don't give any abilities then unless stated otherwise. Cross Gear remain in the battle zone, even when the creature it was crossed onto leaves the battle zone.
To attach a creature to a cross gear, cross the cross gear by paying its mana cost a second time after it has been generated, and choose the creature to be crossed with. The creature will then gain the abilities as listed on the cross gear. A crossed cross gear can also be transferred to another creature by paying its mana cost again. There is no limit on the number of cross gear that can be crossed onto a single creature.
Some cross gear have the Shield Trigger Cross ability. When put into your hand from the shield zone, you can generate the cross gear and cross it onto one of your creatures immediately at no cost.
How to play a castle
A castle allows players to fortify the castle directly to a shield. A castle card gets its ability after it is attached to the shield while the shield is still in play, some castles protect the fortified shield from being broken in exchange for a different shield.
How to play a Dragheart
Just like Psychic Creatures, draghearts are placed into the hyperspatial zone right at the start of the game. To put a dragheart into the battle zone you must have a creature that has an effect that tells you to put a Dragheart into the battle zone, usually of the Draguner race. They usually have Civilization or Cost limits. Despite they have a cost, just like psychic creatures you can't put them into the battle zone by paying it's cost.
There are three types of Dragheart cards; Dragheart Weapon, Dragheart Fortress and Dragheart Creature.
A Dragheart weapon is put into the battle zone equipped to the draguner that put it into the battle zone. You can neither equip it onto another creature (Aside of an Evolution Creature put on top of the Draguner) nor move it onto another creature. If the Equipped creature leaves the battle zone, the weapon is returned to the hyperspatial zone.
A Dragheart Fortress is put into the battle zone horizontally and independent from the creature that put it into the battle zone, but it is not tapped because it does not have a "Tap" concept. If the Dragheart Fortress leaves the battle zone, it is returned into the Hyperspatial zone. They are impossible to remove without cards that remove individual cards from the battle zone due to their card nature.
Nearly all draghearts are capable of performing Dragsolution. When a Dragheart fulfills certain requirements, the player must/may flip them to the Dragheart Creature side, turning it into a creature with enhanced effects. Some Draghearts are capable of 3D Dragsolution, in which if the Dragsolution requirement of a Weapon is fulfilled, it can flip the Fortress side, then to the Creature side.
A Dragheart Creature with a Dragheart Fortress back may have Dragon Evade, an ability that enables it to flip back to the fortress side when the creature would leave the battle zone. This can make the creature extremely difficult to remove due to the card nature of a Fortress.
DMR-16真 Super Battle Guynext x Shin and DMR-16極 Super Battle Guynext x Goku introduced a Dragheart Fortress cycle that is capable of Dragsolutioning into a 5-card Dragheart. When all the required Fortresses are in the battle zone, the player flips them one by one to the Dragheart creature side, forming a massive Dragheart Creature consisting of 5 Dragheart Cells. If one of the Dragheart Cells are removed by Card Removal, all of the cards are returned into the hyperspatial zone and as the creature does not technically leave the battle zone this way, all destruction substitution effects on the creature do not trigger.
How to play a Forbidden card
A Forbidden card starts as a Forbidden Impulse that is put into a various zone at the start of the game. Once it is put into play (Either by paying it's cost or put into the battle zone at the start of the game), put a number of seals on it dictated on the card. Seals are cards from the top of your deck placed onto the impulse face down. When you put a Command that is the same civilization of the impulse, you put a seal into the graveyard. Other card effects will also allow you to put a seal into the graveyard too. Once there are no seals on the Impulse, it Forbidden Liberates and becomes a Forbidden Creature.
A Forbidden Creature behaves like a regular creature, but when it is anywhere other than the battle zone, something detrimental happens, such as forcing the creature to be put into the graveyard, or even causing the player to lose the game. As a forbidden creature is not put into the battle zone, it does not get Summoning Sickness.
Another type of forbidden creature is a one-sided card that is put into the battle zone with a number of seals on it. It does nothing with the seals on it but once it has no seals on it, it behaves as if a regular creature would.
A Forbidden card is counted towards the 40 cards in your deck, so don't accidentally pack 1 more card if you want to use it.
How to play a D2 Field
A D2 Field is a type of new card introduced in Revolution Final. It is horizontal, but it only has one side and can be put into your mana zone. You put it into the battle zone by tapping mana. Once it is in the battle zone, it will activate an effect, usually boosting your creatures. Some D2 Fields have Denjara Switch, which allows you to turn a D2 Field upside down for an effect. Once the effect triggers, Denjara Switch can no longer be used for this D2 Field. In order to remove a D2 field, use card removal or put another D2 field into the battle zone. Only one D2 field can exist in the battle zone at a time; this means that regardless that you or your opponent put the D2 Field into the battle zone, the existing one will be put into the graveyard.
Attacking your opponent
To attack with a creature, you tap one of your creatures that you want to attack with and say what you want it to attack. It can attack your opponent or one of his tapped creatures in the battle zone. When a creature taps to attack, you don't have to tap cards in your mana zone, too; once you've paid to summon a creature, you don't have to pay to have it attack.
When one of your creatures attacks your opponent and it isn't blocked, it "breaks" one of your opponent's shields. That means you choose one of those shields. Your opponent then picks up that shield and puts it into his hand.
When your opponent has no shields left, if one of your creatures attacks him one more time, you win the game. Creatures with a "breaker" ability can break more than one shield when they attack your opponent. If your opponent has fewer shields than your attacking creature can break, your creature doesn't knock out your opponent, just however many shields are left.
Attacking a tapped creature
When one of your creatures attacks one of your opponent's tapped creatures in the battle zone and it isn't blocked, then the creatures battle.
Each creature has a power number in its lower left corner. The creature with the higher power wins the battle. The loser's owner puts it into his graveyard. If the creatures have the same power number, then both creatures go to their owners' graveyards. Some creatures have "+" or "-" after their power. This means that the creature's power can increase or decrease because of something in the creature's text box.
Effects when attacking
When you want one of your creatures to attack, choose which creature you want to attack with, tap it, and choose what it's attacking. Then do any effects that happen because that creature is attacking. After that, your opponent can choose blockers.
Blocking an attack
Only creatures with the "blocker" ability can get in the way to stop creatures from attacking what the attacking player wants them to attack.
You can use one of your "blocker" creatures to stop any attack. When your creature blocks, you have to tap it, so it can block only if it's untapped. Summoning sickness doesn't stop a creature from being able to block.
When a creature blocks, it battles the attacking creature. The attacking creature can't attack what it was going to attack (your opponent or another creature), because it must now battle the blocker.
The creature with the higher power wins the battle. The other creature's owner puts it into his graveyard. If the creatures have the same power, then both creatures go to their owners' graveyards.
Order of attack steps
What happens first can sometimes matter during an attack. The following rules talk about the order in which things happen.
When you tap your creature to attack your opponent, do any effects that say they happen "whenever this creature attacks." Then, if your opponent doesn't block, follow any other instructions on your creature that apply. Then break shields (or win if no shields are left).
When two creatures battle, first follow any instructions on your creature that apply. Then your opponent follows any instructions on his creature that apply. Then compare the powers of the two creatures. If one creature's power is lower, put it in its owner's graveyard. If the powers are the same, put both creatures in their owners' graveyards. Then follow any card instructions that apply after the battle.